Tuesday, July 30, 2013

Creamy Avocado Pasta


This recipe is extremely quick and easy - it took me under 15 minutes, including the amount of time it took for the water to boil!  It's like a mild pesto sauce with the creamy texture of alfredo, and it's definitely going on my go-to list of meals for when school starts and I'm pressed for time.

All you need is one avocado, olive oil, garlic cloves or garlic powder, basil, and pasta.


While the pasta is cooking, you can stick the garlic, olive oil, and avocado into a food processor or, in my case, a blender since I don't own a food processor, and get to work on the sauce.  I wasn't sure if the blender would be able to chop the garlic clove fine enough, so I started with one to test it out.  It did an okay job, but if you don't want the occasional bite that's overloaded with garlic and you don't have a food processor, I recommend garlic powder.

The sauce should look something like this when you're done:


In order to make it less creamy, simply add either a little more olive oil or some of the water that the pasta is cooking in.  Also, the garlic and basil amounts can be adjusted to taste.

Ingredients:
(2 servings)
  • 2 servings of whole wheat pasta
  • 1 medium avocado (pitted)
  • 1-3 cloves garlic (or 1 1/2 tbs garlic powder)
  • 1 1/2 tbs basil
  • 1 tbs olive oil
Directions:
  • Cook the pasta according to the package directions.
  • Combine the olive oil and garlic in a blender/food processor until smooth.
  • Add the pitted avocado and basil to the blender/food processor and mix until creamy. Taste the sauce to see if you want more garlic, basil, or olive oil/water.
  • Drain the pasta when it's done cooking and mix in with the sauce. Serve immediately.
The original recipe says that the recipe doesn't reheat well due to the avocado in the sauce, so I ate it cold for lunch the next day as if it were a type of pasta salad, and it was pretty good.  However I recommend eating it while warm!


Pina Colada Smoothie


I'm addicted to pina coladas.  I drink one for breakfast pretty much every morning.  Well, I drink a virgin one every morning :)  It's a great way to get a couple servings of fruit and a serving of calcium in as you start the day, and it's very refreshing and energizing after a morning workout!

I only use 4 ingredients, and if you want to make it vegan, you can skip out on the honey and it still tastes amazing.


I've found that frozen pineapple works better than fresh pineapple simply because it makes it colder.  You could always add some ice, however in my case, I have one of those personal blenders that makes 1 serving at a time, and the cup isn't big enough to add ice with the other ingredients.


Here's a tip I found on a random website - if I can find the link again I'll post it on here!  If you load your blender with solid foods first, starting with the softest and working up to the hardest/frozen foods, then add your liquid last, it supposedly makes for a better smoothie.  So layer the ingredients bananas, pineapples, honey, then coconut milk!

Ingredients:
(Serves 1)
  • 1 whole banana, broken into pieces
  • 1 c frozen pineapple
  • 1 c coconut milk
  • 1 tbsp honey
Directions:
  • Combine all ingredients into a blender and mix.  
Also you can add 1 shot of rum if you prefer the non-virgin kind of pina coladas, however I highly recommend against adding rum if this is going to be your breakfast!  Please drink responsibly!

Finally, you can add a handful of spinach, kale, or a mix of the two to get a serving of vegetables - you can add these two vegetables to any smoothie and you won't taste it at all!  I've tried this Pinterest myth out myself and it's true!

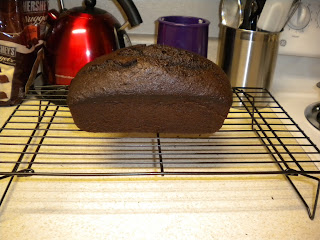
Double Chocolate Banana Bread


This recipe comes from thesistercafe.com - they have a bunch of great stuff on their website!  I have a bunch of bananas going bad so I decided to bake with them before they become completely unusable.  Also this recipe helps appease my insatiable sweet tooth, and since bananas are in the recipe, it automatically is healthy for you, right? :)


 So the original recipe calls for about 3 mashed bananas, which is what I used, but I decided that it's a little too banana-strong, so I cut the recipe back to 2 1/2.  I haven't tried it with the 2 1/2 bananas, but I imagine you can still taste the bananas just fine.


Ingredients:
  • 1 c sugar
  • 2 eggs
  • 1/3 c vegetable oil
  • 2 1/2 mashed bananas
  • 1 tsp vanilla extract
  • 1 1/2 c flour
  • 1/2 c cocoa (I used special dark, but you don't have to)
  • 1 tsp baking soda
  • 1/2 tsp salt
  • 1 c semi sweet chocolate chips
Directions:
  • Spray a bread pan with cooking spray and preheat the oven to 350 F.
  • Beat sugar, eggs, and oil in a medium to large mixing bowl.  When combined, mix in the mashed bananas and vanilla extract until smooth.  
  • In a small mixing bowl, mix the flour, cocoa, baking soda, and salt.  Add to the medium mixing bowl slowly, beating in each addition slowly.
  • Stir in chocolate chips
  • Spoon batter into bread pan. Bake for 60-70 minutes or until an inserted toothpick in the middle comes out clean.
  • Remove from pan and cool completely on a wire rack.

Sunday, July 28, 2013

Pan-Fried Creole Shrimp

I'm so excited to get to try out my new Faberware 8" non-stick skillet with this recipe!  I'd been using a really old skillet previously and finally upgraded :)  I've already used it for scrambled eggs and grilled cheese, and it is great!  Very easy to clean, too, which is always a plus.

I found this recipe in an issue of Cooking Light magazine lying around my parents' house and cooked it for my family while I was visiting home.  It was definitely a success!  This recipe is really simple and quick for both pan-fried shrimp and a dipping sauce with a hint of creole seasoning to give it just a little spice.  The measurements in this recipe are pretty mild as far as spice goes, so if you're a super spicy kind of person I recommend doubling the amounts of creole seasoning.


So one problem I came across was getting the breading to stick on the shrimp, so I wound up adding a bit of flour and bread crumbs mixture to the pan and drizzling a bit of olive oil over it all to help it stick a little better.  Also, the more olive oil you add to the skillet, the more golden brown it will cook!


Also, since I made this for my family I will keep the family-sized portion recipe, however when I make this for myself I plan on quartering or thirding the ingredient amounts to give myself 2 portions.  I'm really big on cooking 2 servings for dinner and saving the second serving for the next day's lunch, it's really convenient so I can get back to school/work on time and not worry about cooking something fresh!


Ingredients:
(Serves 4-6)
  • 1/2 cup flour
  • 1 1/4 tsp Creole seasoning (Tony Chachere), divided
  • 1/8 tsp salt
  • 1/4 cup milk
  • 3/4 cup dry breadcrumbs
  • 1 1/2 pounds peeled and deveined large shrimp
  • 3 tbs olive oil, divided
  • 2 tbs mayonnaise
  • 1 tsp Worcestershire sauce
  • 1/4 tsp hot sauce
Directions:
  • Combine flour, 1tsp Creole seasoning, salt in shallow dish.  Pour milk in shallow dish.  Place breadcrumbs in shallow dish.  Dredge shrimp in the three dishes in order listed.
  • Heat large non-stick skillet over med-high heat.  Add 1-1/2 tbs olive oil.  Add half of shrimp.  Cook 2 minutes on each side or until done.  Repeat with remaining oil and shrimp.
  • Combine mayo, remaining Creole seasoning, Worcestershire and hot sauce in small bowl with whisk.  Serve sauce with shrimp.

Sunday, July 14, 2013

Garden Pasta

This is virtually the same as my tomato artichoke pasta recipe, but I added a few new ingredients.  I was inspired by a meal I had at Jason's Deli: Zucchini Garden Pasta.  So this is my rendition of that meal.

First I chop up some zucchini or Italian squash, tomatoes, and artichokes.  While I'm chopping these, I heat some olive oil with garlic powder and oregano in a sauce pan on low-medium heat.  Once the oil is hot, I add the chopped vegetables to the pan, along with some spinach.

While the vegetables saute a little, I cook some noodles, occasionally tossing the vegetables so that they don't burn.

Once the pasta is done, I mix the pasta and veggies, add a little parmesan cheese, and if needed, add a little more of the olive oil, garlic, and oregano sauce from the pan.  And voila, a simple, easy, and healthy meal!

Ingredients (makes about 2 servings):
Note: these ingredients are estimates, because this recipe does not need to be precise at all.  All measurements are simply to taste.  Here are some recommendations on amounts:

  • 1/2 c Italian squash/zucchini
  • 1/2 c tomato
  • 1/2 c artichoke hearts
  • 1/2 c spinach leaves
  • 1 tbs oregano
  • 1 tbs garlic powder
  • 2 tbs olive oil
  • 1 c pasta
  • 1/4 c parmesan cheese
Directions:
  • Heat the olive oil, oregano, and garlic powder in a sauce pan over low to medium heat.
  • Chop the squash/zucchini, artichoke hearts, and tomato, and add them to the heated oil with the spinach leaves.
  • Cook the pasta according to the package directions.
  • Drain the pasta and mix with the vegetables and leftover olive oil sauce.  Sprinkle parmesan cheese over the pasta and serve while hot.
Inspired by: Jason's Deli Garden Zucchini Pasta.

Pictures will come soon!

Zebra Chocolate Chip Cookies

I call these zebra chocolate chip cookies because they use both white and milk chocolate chips.  I took the Nestle Tollhouse recipe and edited it to my liking, mainly by adding more chocolate!  Their recipe calls for nuts, but I prefer my chocolate chip cookies without nuts, so I substituted the white chocolate chips in their place.

The ingredients I used are pictured here...minus the chocolate chips!


Mixing them all together with a hand mixer and adding the chocolate chips, I decided that there weren't enough chocolate chips to have some in every cookie (the original recipe calls for 2 cups total of chocolate chips, so I put 1 cup semi-sweet and 1 cup white into the batter).  So I doubled what Nestle recommended so that it looked more like this.


I then popped them in the oven, and 10 minutes later was rewarded with these beauties!


They were delicious - I brought them to work and my coworkers agreed that they were awesome!  So here's the recipe!  Warning: this recipe makes about 60 cookies, so unless you're baking for a large family or a party or something involving lots of people, you probably want to reduce the quantities!

Ingredients:
  • 2 1/4 c all-purpose flour
  • 1 tsp baking soda
  • 1 tsp salt
  • 2 sticks butter, softened
  • 3/4 c granulated sugar
  • 3/4 c brown sugar
  • 1 tsp vanilla extract
  • 2 large eggs
  • 2 c semi-sweet chocolate chips
  • 2 c white chocolate chips
Directions:
  • Preheat oven to 375 F.
  • Combine flour, baking soda, and salt in a small bowl.  
  • Beat butter, granulated sugar, brown sugar, and vanilla extract in a large bowl until creamy.  Add the eggs one at a time and beat them into the mixture.  Gradually beat in flour mixture.
  • Add the chocolate chips (both white and semi-sweet) and mix well.
  • Drop tablespoon-sized drops onto baking sheets.
  • Bake for 9-11 minutes or until golden brown.  Allow to cool for 2 minutes on baking sheets, then transfer to cooling racks.


Lasagna

This is my mom's famous lasagna recipe.  It is the best lasagna I've ever eaten, hands down.  I never order lasagna at restaurants because I know it will never be as good as this lasagna. Seriously.  This recipe makes 2 trays worth of lasagna, mainly due to the sauce, but you can make only 1 tray and freeze the leftover sauce, or you can do what I do and make 2 trays and freeze the leftover lasagna.  I don't bake the second tray until I'm ready to eat a piece - I just stick it straight into the freezer after assembling it.

It's fairly simple: meat and mushrooms for the tomato sauce, cottage cheese (which is much better for you than ricotta), mozzarella, and parmesan to be sprinkled on top.


First you need to brown the ground beef in a sauce pan.  Put the tomato paste and chopped tomatoes in a pot to simmer, and chop some mushrooms while the meat browns.


Once it looks like this, add it to the tomato sauce with the chopped mushrooms.  Add garlic powder and oregano to season.


The sauce should look something like this.  Once the sauce is assembled and simmering, cook the noodles.


After the noodles are cooked and drained, it's time to assemble the lasagna!  First place down one layer of noodles.  Spread 1 large spoonful of sauce over the cottage cheese.  I use a large serving spoon heaping with sauce.  It should look something like this:


Add 1 large spoonful of cottage cheese and spread over the sauce, so that it looks about like this:


Add a layer of shredded mozzarella on top, then start again with the noodles and repeat.


After the second layer of noodles, sauce, and cottage cheese is complete, it should look something like this:


Add the remaining mozzarella cheese on top, then sprinkle generously with parmesan cheese.


Bake it in the oven at 375 F for 30-35 minutes.


And you're done!  It goes well with garlic bread and a side salad, and any leftovers can be frozen and easily reheated in either the microwave or oven.

Ingredients:
  • 1 lb ground beef
  • 1 28 oz can peeled crushed tomatoes
  • 1 12 oz can tomato paste
  • 1 tbs oregano (appx - add to taste)
  • 1 tbs garlic powder (appx - add to taste)
  • 1 container of chopped mushrooms 
  • 1 package lasagna noodles
  • 6 cups grated/shredded mozzarella
  • 2 24 oz cottage cheese (low fat)
  • 1 c grated parmesan cheese
Directions:
  • Preheat the oven to 375 F.
  • Brown the ground beef in a sauce pan.
  • Put the tomato paste and crushed tomatoes into a pot and let heat while the beef browns.  Chop the mushrooms.
  • Add the ground beef and mushrooms to the tomatoes and let sauce simmer.
  • Cook the noodles per package instructions.
  • Drain noodles and assemble the lasagna as follows:
    • Layer of noodles
    • Spoonful of sauce spread evenly over noodles
    • Spoonful of cottage cheese spread evenly over sauce
    • Mozzarella cheese spread evenly over cottage cheese
  • Depending on the size of your lasagna tray, this makes 2-3 layers.  Sprinkle parmesan cheese on the top layer.
  • Bake in the oven for 30-35 minutes.  Alternatively, you can cook in the microwave on power 7 for 15-20 minutes, but the oven tastes better in my opinion.
Inspiration for this recipe comes from my mom :)


Pesto Ranch Chicken

Here's a delicious slow cooker recipe that's really easy and makes a fantastic dinner!  The recipe I borrowed is intended to serve 8, but I've modified it to serve 2 and make extra sauce, because I love soaking up extra sauce with noodles, rice, or bread rolls after a meal is over.

This recipe requires only 4 ingredients! (The chicken is already in the crockpot in this picture)


You simply add all of the ingredients into the crockpot, stir them up a little, then let them cook, and about 6 hours later you have tender, flavorful chicken breasts that go perfect either over noodles, over rice, or as the original recipe website suggests, with mashed potatoes and a salad.


Unfortunately I do not have a photo of the finished meal on a plate - I live in Oklahoma, and this meal happened to be what I ate on the day that one of the many F5 tornadoes we've been unlucky enough to get this summer touched down way too close to home.  So after work I ran home, scooped it quickly into some tupperware as the sky turned darker and greener, and drove quickly to a building with a basement just as the sirens went off!  I will try to put a picture of the finished meal up next time I make this recipe.

Ingredients:
  • 3 chicken breasts
  • 3 oz pesto sauce
  • 1/2 packet dry ranch seasoning
  • 1/4 c chicken broth
Directions:
  • Place all of the ingredients into the crockpot.  Stir to mix the flavors and coat the chicken.
  • Cook on high for 3-4 hours or low for 6-8 hours.

And if you would like to donate to the relief efforts of one of the devastating tornadoes that recently hit Oklahoma, please do so here: https://servemoore.com/give/


Tomato and Pesto Grilled Cheese

This is a recipe for a grilled cheese that does not involve any butter!!! I repeat: no butter!!! Woohoo for healthy eating!!!  I use olive oil as a healthy substitute, and it tastes excellent.

I decided to take a normal grilled cheese and upscale it by adding some tomatoes and pesto sauce.


I also use muenster cheese instead of the typical American cheese.  I've also made it with mozzarella, which is really good too.


I like to assemble it before placing it into the pan, and I don't add butter or olive oil at all.  Instead I just let the bread soak up the olive oil from the skillet.


I cook it open-faced for a few minutes to let each piece of bread soak in the olive oil individually.  


Then I put the piece without the tomatoes on top of the piece with the tomatoes (it's much less messy that way!) to let the sandwich pieces all melt together.


This recipe is super easy and quick - I've been making it during my lunch breaks from work, and it is definitely a favorite.


Ingredients:

  • 1 tbs olive oil
  • 2 slices whole wheat bread
  • 1/2 of a tomato
  • 1-2 slices cheese - my favorite kinds are mozzarella or muenster
  • 1 1/2 tsp pesto (appx)
Directions:
  • Heat the olive oil in a skillet on low to medium heat.
  • Slice the tomato into thin slices - about 4 small slices will fit on one piece of bread
  • Lay 1 slice of cheese onto a piece of bread, then layer the tomato slices on top of the cheese and place in the skillet.
  • Spread the pesto onto the remaining slice of bread (optional: if you want 2 slices of cheese, add the second slice on top of the pesto)
  • Place the second piece of bread in the skillet as well.  Let the sandwich sit open-faced for a minute or two.
  • Put the pesto-covered bread on top of the bread with the tomato slices and let the sandwich melt together. Flip the sandwich after 2-3 minutes to prevent one side of the bread from getting burnt.
  • After about 5 minutes or so, the cheese should be melted sufficiently and the sandwich is ready to eat.